
这个转场系列的第三篇。我已经感觉到有些许轻车熟路了。我也不知道会不会有第四篇第五篇,总之,当我看到优秀的动画,并在我能力范围能落实的,我都会把实现思路写下来,分享出来。
这是第三篇的转场动画的Demo:

实现原理:
第一步:布置界面
这步已经真的没什么好说的了,快进。

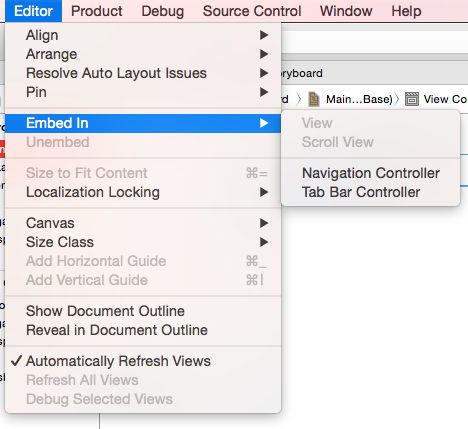
唯一有一个小技巧就是,在刚创建一个项目的时候,Storyboard里面已有一个默认的ViewController。而这时候你想要让一个NavigationController去控制全部的ViewController,这时候你可以在Editor->Embed in->Navigation Controller里面完成这一步,下如图。
界面画好了,按住 control 拖动实现push的 Segue。

现在运行,就简单地完成了原生的Push/Pop动画:

第二步:实现圆圆圈从小放大的动画
新建一个文件 PingTransition :
@interface PingTransition : NSObject<UIViewControllerAnimatedTransitioning>
如果你看过我之前的两篇博客那么你对其中两个协议方法应该已经很熟悉了。
//设置动画时间
- (NSTimeInterval)transitionDuration:(id <UIViewControllerContextTransitioning>)transitionContext{
    return  0.5f;
}
接下来是具体的动画实现的主要代码。
大致思路是这样从,我们画两个内塞尔曲线的圆,第一个小圆的frame和右上角圆形按钮的大小一样,第二个大圆则是覆盖了整个屏幕。然后,去设置view.layer.mask属性,让这个mask从小圆动画到大圆。
- (void)animateTransition:(id <UIViewControllerContextTransitioning>)transitionContext{

    self.transitionContext = transitionContext;

    ViewController * fromVC = (ViewController *)[transitionContext viewControllerForKey:UITransitionContextFromViewControllerKey];
    SecondViewController *toVC = (SecondViewController *)[transitionContext viewControllerForKey:UITransitionContextToViewControllerKey];
    UIView *contView = [transitionContext containerView];
    UIButton *button = fromVC.button;

    [contView addSubview:toVC.view];


    //创建两个圆形的 UIBezierPath 实例;一个是 button 的 size ,另外一个则拥有足够覆盖屏幕的半径。最终的动画则是在这两个贝塞尔路径之间进行的
    UIBezierPath *maskStartBP =  [UIBezierPath bezierPathWithOvalInRect:button.frame];

//    CGPoint finalPoint = CGPointMake(button.center.x - 0, button.center.y - CGRectGetMaxY(toVC.view.bounds));
    CGPoint finalPoint = CGPointMake(button.center.x - 0, button.center.y - CGRectGetMaxY(toVC.view.bounds));
    CGFloat radius = sqrt((finalPoint.x * finalPoint.x) + (finalPoint.y * finalPoint.y));
    UIBezierPath *maskFinalBP = [UIBezierPath bezierPathWithOvalInRect:CGRectInset(button.frame, -radius, -radius)];


    //创建一个 CAShapeLayer 来负责展示圆形遮盖
    CAShapeLayer *maskLayer = [CAShapeLayer layer];
    maskLayer.path = maskFinalBP.CGPath; //将它的 path 指定为最终的 path 来避免在动画完成后会回弹
    toVC.view.layer.mask = maskLayer;


    //创建一个关于 path 的 CABasicAnimation 动画来从 circleMaskPathInitial.CGPath 到 circleMaskPathFinal.CGPath 。同时指定它的 delegate 来在完成动画时做一些清除工作
    CABasicAnimation *maskLayerAnimation = [CABasicAnimation animationWithKeyPath:@"path"];
    maskLayerAnimation.fromValue = (__bridge id)(maskStartBP.CGPath);
    maskLayerAnimation.toValue = (__bridge id)((maskFinalBP.CGPath));
    maskLayerAnimation.duration = [self transitionDuration:transitionContext];
    maskLayerAnimation.delegate = self;

    [maskLayer addAnimation:maskLayerAnimation forKey:@"path"];

}
该有的注释都在代码中注释了。有两处要解释。
1、大圆的贝塞尔曲线,可以通过 CGRectInset(button.frame, -radius, -radius)获得,所以,问题就转换成了如何获得大圆的半径(因为大圆和小圆的中心点的一致的)。这里我用了勾股定理,其实你只要在草图上画一画就很很明白了。这时我当时的草图:

2、
CGRectInset ——
CGRect CGRectInset (
CGRect rect,
CGFloat dx,
CGFloat dy
);
该结构体的应用是以原rect为中心,再参考dx,dy,进行缩放或者放大。
CGRectOffset ——
CGRect CGRectOffset(
CGRect rect,
CGFloat dx,
CGFloat dy
);
相对于源矩形原点rect(左上角的点)沿x轴和y轴偏移, 在rect基础上沿x轴和y轴偏移
CGRectGetMinX(CGRect rect) rect最左边的X坐标
CGRectGetMidX(CGRect rect) rect中点的X坐标
CGRectGetMinY(CGRect rect) rect最上方的Y坐标
CGRectGetMaxY(CGRect rect) rect最下方的Y坐标
动画结束之后的一些扫尾工作:
#pragma mark - CABasicAnimation的Delegate
- (void)animationDidStop:(CAAnimation *)anim finished:(BOOL)flag{

    //告诉 iOS 这个 transition 完成
    [self.transitionContext completeTransition:![self. transitionContext transitionWasCancelled]];
    //清除 fromVC 的 mask
    [self.transitionContext viewControllerForKey:UITransitionContextFromViewControllerKey].view.layer.mask = nil;
    [self.transitionContext viewControllerForKey:UITransitionContextToViewControllerKey].view.layer.mask = nil;

}
第三步:使用这个动画
由于圆圈从小放大是在push的时候发生的,所以我们在第一个VC里面实现。
因为导航控制器去控制两个界面,所以需要先实现UINavigationControllerDelegate
@interface ViewController : UIViewController<UINavigationControllerDelegate>
然后,然后,一定不能在 ViewDidLoad 里面声明这个delegate,在 viewWillAppear 或者 viewDidAppear里面声明。
-(void)viewWillAppear:(BOOL)animated{
    self.navigationController.delegate = self;
}
实现协议方法:
#pragma mark - UINavigationControllerDelegate
- (id <UIViewControllerAnimatedTransitioning>)navigationController:(UINavigationController *)navigationController
                                   animationControllerForOperation:(UINavigationControllerOperation)operation
                                                fromViewController:(UIViewController *)fromVC
                                                  toViewController:(UIViewController *)toVC{
    if (operation == UINavigationControllerOperationPush) {

        PingTransition *ping = [PingTransition new];
        return ping;
    }else{
        return nil;
    }
}
现在你已经完成了push的动画。我希望你能自己实现一下pop的反转动画。自己思考过了如果还是想不出来可以来这里下载源代码。
有任何疑问可以在下面评论里告诉我。